
![[Event] Free Familiar Distribution — [Abyssal Direwolf]](https://clan.akamai.steamstatic.com/images/46066795/0eec022b4b767b5146b104bda7eeebb5ad325844.png?#)


![[PRO Tips] Gold’s Bullish Revival: Seasonal Trends and Key Levels to Watch](https://xinker.org/uploads/images/202412/image_430x256_67724cc6ad0cd.webp)
![[PRO Tips] Gold Market Under Short-Term Pressure, Safe-Haven Demand and Central Bank Buying Support Long-Term Upside Potential](https://xinker.org/uploads/images/202412/image_430x256_676ffb4685287.webp)
![[PRO Tips] Analysis of 9 key points of differentiation strategy! Master differentiation to create a brand advantage that is unique in the world!](https://firebasestorage.googleapis.com/v0/b/xinker-tips.appspot.com/o/article_thumbnails%2Fscaled_differentiation%20strategy.png.png?alt=media&token=a1bfc3d2-e85a-4db7-8a6d-01c7274f8940)
![[PRO Tips] Will REITs regain growth momentum in 2024? 3 REITs ETFs you must know if you want to invest in real estate.](https://firebasestorage.googleapis.com/v0/b/xinker-tips.appspot.com/o/article_thumbnails%2Fscaled_REITs1.png.png?alt=media&token=8af4eb93-33ff-466f-8039-b6555fad52b4)
![[PRO Tips] Complete tutorial on how to make money in Adobe Stock!](https://firebasestorage.googleapis.com/v0/b/xinker-tips.appspot.com/o/article_thumbnails%2Fscaled_tut-adobe1.png.png?alt=media&token=0b2c8cf2-22bd-4142-883e-140ed1cbaf02)
![[Passive Income] Unlock the secret of passive income: 3 steps to apply for Google AdSense](https://xinker.org/uploads/images/202410/image_430x256_6717a4fb3052b.webp)
![[Passive Income] Earn over $200 a day with AI-generated articles!](https://firebasestorage.googleapis.com/v0/b/xinker-tips.appspot.com/o/article_thumbnails%2Fscaled_article1.png.png?alt=media&token=f61bf35b-8553-4719-826d-7360024adc70)
![[Passive Income] Earn over 20 USD per download with AI-generated images!](https://firebasestorage.googleapis.com/v0/b/xinker-tips.appspot.com/o/article_thumbnails%2Fscaled_adobe2.png.png?alt=media&token=3e20e76a-a907-45af-80aa-bf9b3600301f)
![[Passive Income] Earn 10 USD per new download by sharing CapCut!](https://firebasestorage.googleapis.com/v0/b/xinker-tips.appspot.com/o/article_thumbnails%2Fscaled_capcut2.png.png?alt=media&token=a04dec40-1fac-4857-86f2-19a8be02d38e)
![[Passive Income] Use your WiFi to create passive income in 5 minutes, and you can earn 4-6 U per day!](https://firebasestorage.googleapis.com/v0/b/xinker-tips.appspot.com/o/article_thumbnails%2Fscaled_Grassio.webp.png?alt=media&token=7659a95e-0e47-4f27-a17d-c942ac3cf7f4)


![[Business Talk] The Unique Theme of XINKER's Song: Beef Wellington and Business Mastery](https://xinker.org/uploads/images/202410/image_430x256_671afc155f47f.webp)
![[Business Talk] Chagee: Opening 3,500 stores in 6 years](https://xinker.org/uploads/images/202410/image_430x256_671afce80c5f9.webp)

All MOLE puzzles and how to solve them
It wouldn’t be a horror game without puzzles, and MOLE switches up the environment and solutions to keep you on your toes and demonstrate the unravelling mind of our protagonist. Designed similarly to System Shock, MOLE doesn’t try to hold your hand. Instead, you’re thrown into a bottomless pit and compelled to keep digging. No two puzzles are the same. So, we’re here to help provide all MOLE puzzle solutions so you can reach the incredible ending a little more easily. Table of contentsMOLE puzzle guide: Solutions and stepsFusebox puzzlePhone puzzleEngine puzzleHospital puzzleTorpedo puzzleGun case puzzleMosaic puzzlehttps://embeds.beehiiv.com/a8d62108-86ed-4039-bf49-44877ba62c15 MOLE puzzle guide: Solutions and steps Fusebox puzzle Screenshot by Destructoid The first puzzle in the game is figuring out how to power different sectors of MOLE. You must restore power every time you move a fuse across to light a new sector. Here’s a quick breakdown on using the Fusebox, regardless of how many fuses you’re using in one go: Insert fuse(s) into the sector you wish to unlock. Turn the numbered dial in accordance with the number of fuses you have (inserted in sector(s)). Point the arrow towards the correct number of fuses currently being used. Flip switches 1, 3, 6, and 7 so that they’re pointing down, the rest remaining upward. Hold the large button under the numbered dial until it glows. Pull down the large lever on the left to activate power. Phone puzzle Screenshot by Destructoid Everything you need to solve this puzzle is inside the phone box. Here’s all the information to hand VOSTOK, delivered in chronological order: Dial 8 273 6409 Cassette identification number: 51# Hospital identification number: 12# Age of person associated with this record: 6# Date of this memory: 020179# Engine puzzle Screenshot by Destructoid The part of Engine you’re eyeing to fix is the machinery opposite engineer Bohdan Pluzhnik’s body. Here’s how to fix the three broken parts: Ventilation Pick up the fan at the back of Engine, amongst Pluzhnik’s equipment and propane tanks. Go to the Engine room where his body is and to the back-right corner to replace the broken fan. Use the screwdriver to remove and fix the fans. Pumps There is a crawlspace to the close-right corner of the Engine room to get underneath the machinery you’re fixing. There’s a loose fuse already on the floor in the crawlspace, but you need another. Grab one of the fuses from the Fusebox in Rec to replace the broken part down in the Engine room. This will restore the power to 100V. Keep the remaining two fuses in Deck and Engine to make life a little easier for you. Coolant Grab the Wrench off Pluzhnik’s workbench in the main sector of Engine (opposite the torpedo locker). Go to Engine room, turn right, past the crawlspace, and crouch underneath the pipework to reach a small area where steam is pouring out of a loose pipe. Use the Wrench to tighten the bolt nut. Hospital puzzle Screenshot by Destructoid Go behind the receptionist desk and interact with the monitor, looking at the breathing patient strapped to a hospital bed. Though invisible in the physical realm, go out into the lobby and interact with the hospital bed to start this puzzle. The goal is to reach a particular door, but you won’t know it yet. You must go to the rooms that are shown on the monitors. The first digit – ‘3‘ is provided upon clicking on the hospital bed in the lobby. Next, find the lounge at the back right corner of the hospital wing (use the map in reception to help) and interact with the television. Upon doing so, you will hear someone invisible walking around. Finally, locate room 311 and go inside. Return to the receptionist desk to get the room number ‘3 1 7.’ The key will be given only when the code shows across all three monitors. With the key, head over to Petro’s hospital room, where you have to turn off life support to transfer his memory over to a VOSTOK cassette. Flip the switches in this order: 2-4-3-5-1, and turn the console off. Torpedo puzzle Screenshot by Destructoid This puzzle can be a bit fiddly. There’s a key in this room that will open the locker full of torpedoes in the engineer room, opposite the Engine. But first, you need to spin the wheel to lift the metal prod atop the torpedo pod, use the arrow keys underneath to remove the lock mechanism so you can then lift the pod, slide it open, and place a torpedo inside. Do the same steps, this time in reverse, to lower and seal the explosive. The detonator is usable if you’ve done these steps correctly. Look at the depth meter to follow the torpedo’s path to its target. Interact with the detonator to push the button, wait until the torpedo’s mark hits the target, and interact once again to detonate. Gun case puzzle Screenshot by Destructoid Unlocking the gun is very simple once you read the note left on the case. It tells you to check the dorms and locate each number of the four-digit code left on a red sticky n

It wouldn’t be a horror game without puzzles, and MOLE switches up the environment and solutions to keep you on your toes and demonstrate the unravelling mind of our protagonist.
Designed similarly to System Shock, MOLE doesn’t try to hold your hand. Instead, you’re thrown into a bottomless pit and compelled to keep digging. No two puzzles are the same. So, we’re here to help provide all MOLE puzzle solutions so you can reach the incredible ending a little more easily.
 Screenshot by Destructoid The first puzzle in the game is figuring out how to power different sectors of MOLE. You must restore power every time you move a fuse across to light a new sector. Here’s a quick breakdown on using the Fusebox, regardless of how many fuses you’re using in one go:
 Screenshot by Destructoid Everything you need to solve this puzzle is inside the phone box. Here’s all the information to hand VOSTOK, delivered in chronological order:
 Screenshot by Destructoid The part of Engine you’re eyeing to fix is the machinery opposite engineer Bohdan Pluzhnik’s body. Here’s how to fix the three broken parts:
 Screenshot by Destructoid Go behind the receptionist desk and interact with the monitor, looking at the breathing patient strapped to a hospital bed. Though invisible in the physical realm, go out into the lobby and interact with the hospital bed to start this puzzle. The goal is to reach a particular door, but you won’t know it yet. You must go to the rooms that are shown on the monitors. The first digit – ‘3‘ is provided upon clicking on the hospital bed in the lobby.
Next, find the lounge at the back right corner of the hospital wing (use the map in reception to help) and interact with the television. Upon doing so, you will hear someone invisible walking around.
Finally, locate room 311 and go inside. Return to the receptionist desk to get the room number ‘3 1 7.’ The key will be given only when the code shows across all three monitors. With the key, head over to Petro’s hospital room, where you have to turn off life support to transfer his memory over to a VOSTOK cassette. Flip the switches in this order: 2-4-3-5-1, and turn the console off.
 Screenshot by Destructoid This puzzle can be a bit fiddly. There’s a key in this room that will open the locker full of torpedoes in the engineer room, opposite the Engine. But first, you need to spin the wheel to lift the metal prod atop the torpedo pod, use the arrow keys underneath to remove the lock mechanism so you can then lift the pod, slide it open, and place a torpedo inside. Do the same steps, this time in reverse, to lower and seal the explosive.
The detonator is usable if you’ve done these steps correctly. Look at the depth meter to follow the torpedo’s path to its target. Interact with the detonator to push the button, wait until the torpedo’s mark hits the target, and interact once again to detonate.
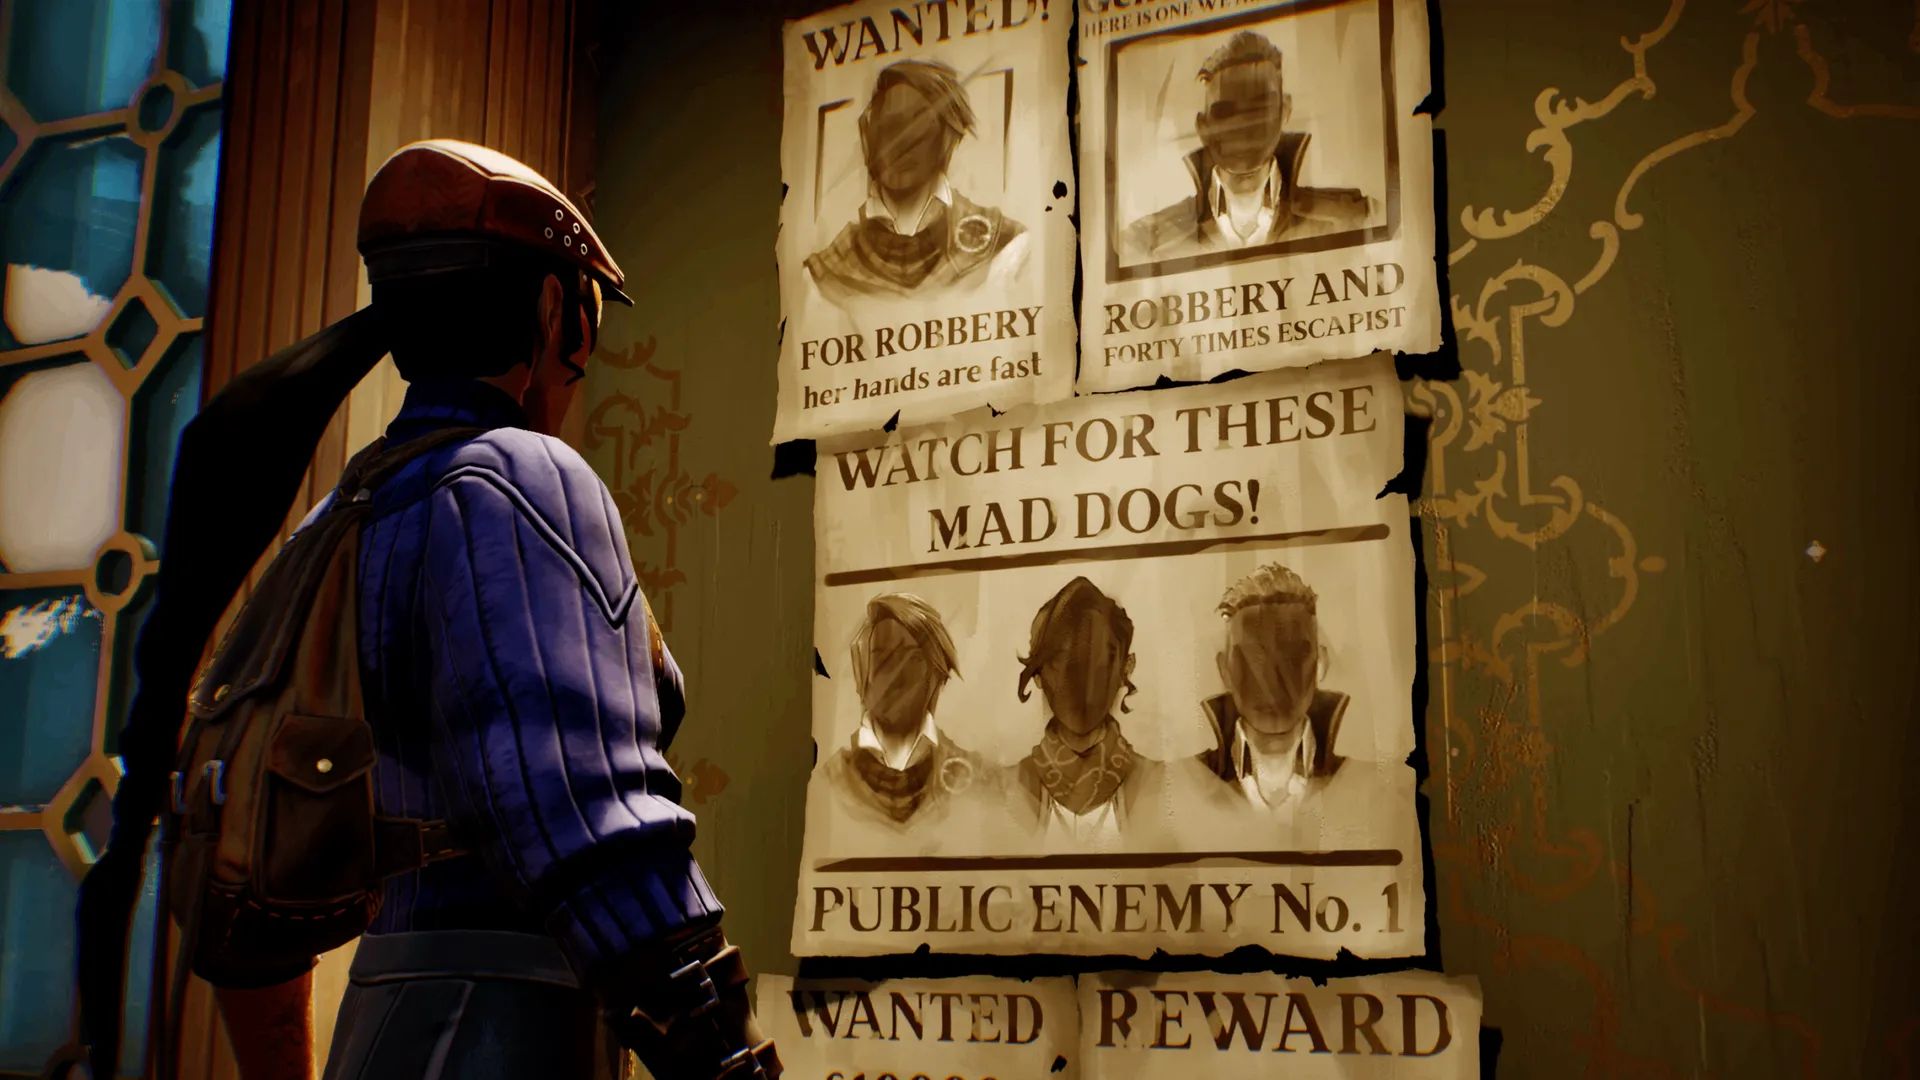
 Screenshot by Destructoid Unlocking the gun is very simple once you read the note left on the case. It tells you to check the dorms and locate each number of the four-digit code left on a red sticky note in the Administrator, Navigator, Geologist, and Engineer’s quarters. These are the four rooms inside the rooms where MOLE’s team lives. The code you’re looking for is 8 3 5 7.
The order from left to right is as follows:
 0 The post All MOLE puzzles and how to solve them appeared first on Destructoid.
Designed similarly to System Shock, MOLE doesn’t try to hold your hand. Instead, you’re thrown into a bottomless pit and compelled to keep digging. No two puzzles are the same. So, we’re here to help provide all MOLE puzzle solutions so you can reach the incredible ending a little more easily.
Table of contents
https://embeds.beehiiv.com/a8d62108-86ed-4039-bf49-44877ba62c15 MOLE puzzle guide: Solutions and steps
Fusebox puzzle
Screenshot by Destructoid The first puzzle in the game is figuring out how to power different sectors of MOLE. You must restore power every time you move a fuse across to light a new sector. Here’s a quick breakdown on using the Fusebox, regardless of how many fuses you’re using in one go:- Insert fuse(s) into the sector you wish to unlock.
- Turn the numbered dial in accordance with the number of fuses you have (inserted in sector(s)). Point the arrow towards the correct number of fuses currently being used.
- Flip switches 1, 3, 6, and 7 so that they’re pointing down, the rest remaining upward.
- Hold the large button under the numbered dial until it glows.
- Pull down the large lever on the left to activate power.
Phone puzzle
Screenshot by Destructoid Everything you need to solve this puzzle is inside the phone box. Here’s all the information to hand VOSTOK, delivered in chronological order:- Dial 8 273 6409
- Cassette identification number: 51#
- Hospital identification number: 12#
- Age of person associated with this record: 6#
- Date of this memory: 020179#
Engine puzzle
Screenshot by Destructoid The part of Engine you’re eyeing to fix is the machinery opposite engineer Bohdan Pluzhnik’s body. Here’s how to fix the three broken parts:Ventilation
Pick up the fan at the back of Engine, amongst Pluzhnik’s equipment and propane tanks. Go to the Engine room where his body is and to the back-right corner to replace the broken fan. Use the screwdriver to remove and fix the fans.Pumps
There is a crawlspace to the close-right corner of the Engine room to get underneath the machinery you’re fixing. There’s a loose fuse already on the floor in the crawlspace, but you need another. Grab one of the fuses from the Fusebox in Rec to replace the broken part down in the Engine room. This will restore the power to 100V. Keep the remaining two fuses in Deck and Engine to make life a little easier for you.Coolant
Grab the Wrench off Pluzhnik’s workbench in the main sector of Engine (opposite the torpedo locker). Go to Engine room, turn right, past the crawlspace, and crouch underneath the pipework to reach a small area where steam is pouring out of a loose pipe. Use the Wrench to tighten the bolt nut.Hospital puzzle
Screenshot by Destructoid Go behind the receptionist desk and interact with the monitor, looking at the breathing patient strapped to a hospital bed. Though invisible in the physical realm, go out into the lobby and interact with the hospital bed to start this puzzle. The goal is to reach a particular door, but you won’t know it yet. You must go to the rooms that are shown on the monitors. The first digit – ‘3‘ is provided upon clicking on the hospital bed in the lobby.Next, find the lounge at the back right corner of the hospital wing (use the map in reception to help) and interact with the television. Upon doing so, you will hear someone invisible walking around.
Finally, locate room 311 and go inside. Return to the receptionist desk to get the room number ‘3 1 7.’ The key will be given only when the code shows across all three monitors. With the key, head over to Petro’s hospital room, where you have to turn off life support to transfer his memory over to a VOSTOK cassette. Flip the switches in this order: 2-4-3-5-1, and turn the console off.
Torpedo puzzle
Screenshot by Destructoid This puzzle can be a bit fiddly. There’s a key in this room that will open the locker full of torpedoes in the engineer room, opposite the Engine. But first, you need to spin the wheel to lift the metal prod atop the torpedo pod, use the arrow keys underneath to remove the lock mechanism so you can then lift the pod, slide it open, and place a torpedo inside. Do the same steps, this time in reverse, to lower and seal the explosive.The detonator is usable if you’ve done these steps correctly. Look at the depth meter to follow the torpedo’s path to its target. Interact with the detonator to push the button, wait until the torpedo’s mark hits the target, and interact once again to detonate.
Gun case puzzle
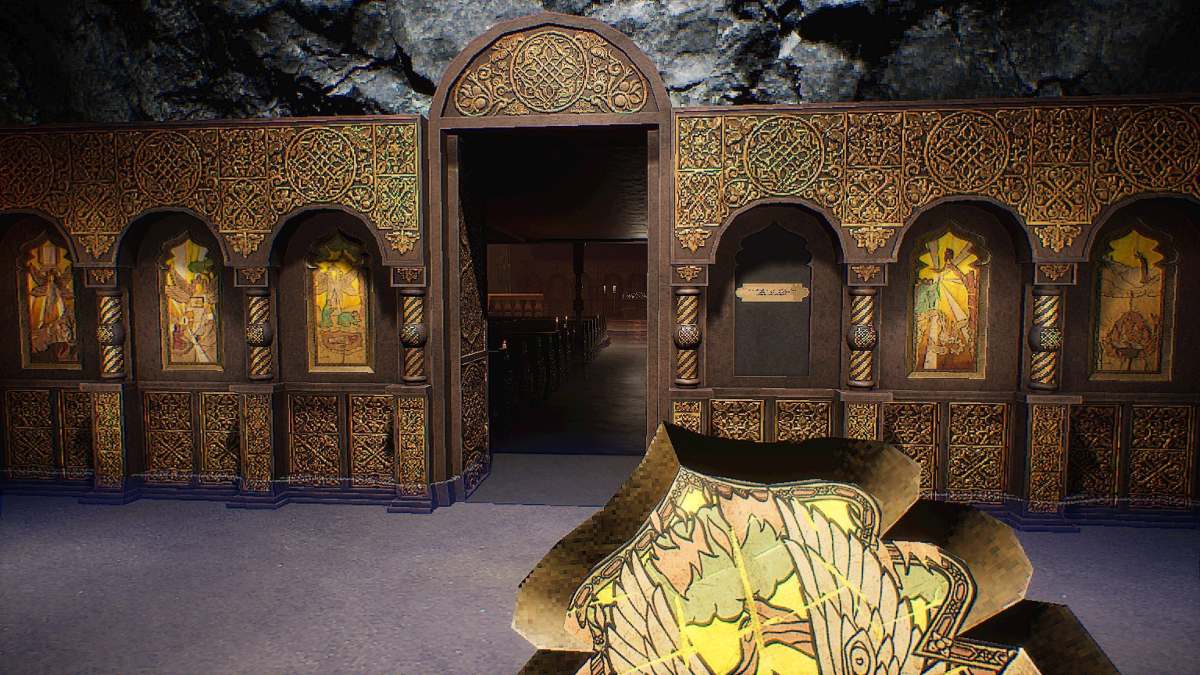
Screenshot by Destructoid Unlocking the gun is very simple once you read the note left on the case. It tells you to check the dorms and locate each number of the four-digit code left on a red sticky note in the Administrator, Navigator, Geologist, and Engineer’s quarters. These are the four rooms inside the rooms where MOLE’s team lives. The code you’re looking for is 8 3 5 7.Mosaic puzzle
 Screenshot by Destructoid
 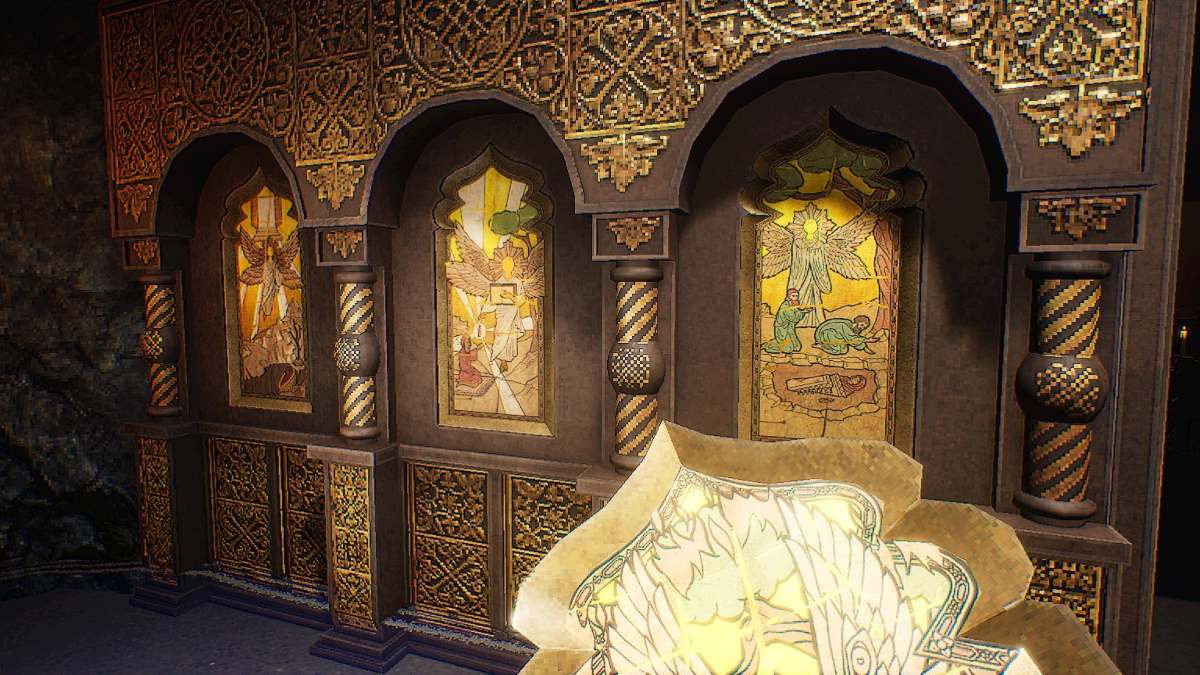 Screenshot by Destructoid
 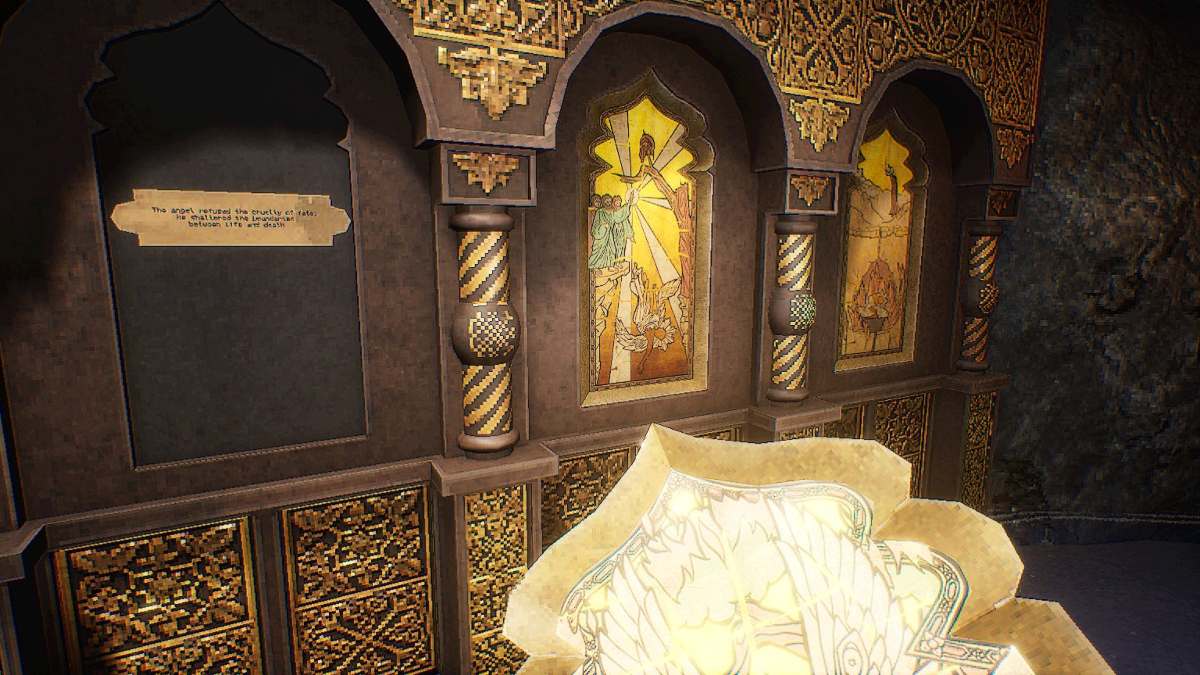 Screenshot by Destructoid
The order from left to right is as follows:
- Angel appearing from Heaven’s door and onto land.
- Angel reading from book, providing offerings to the people.
- Two bearded men praying as they bury a woman, the Angel stood behind them.
- Angel and human stood at the center, arms spread out.
- Humans throwing the Angel off the edge.
- Angel buried in golden stone, deep underground.
What's Your Reaction?


XINKER - Business and Income Tips
Explore XINKER, the ultimate platform for mastering business strategies, discovering passive income opportunities, and learning success principles. Join a community of thinkers dedicated to achieving financial freedom and entrepreneurial excellence.

![[Business Talk] Chagee: Opening 3,500 stores in 6 years](https://xinker.org/uploads/images/202410/image_140x98_671afce94bf91.webp)