


![[PRO Tips] Gold’s Bullish Revival: Seasonal Trends and Key Levels to Watch](https://xinker.org/uploads/images/202412/image_430x256_67724cc6ad0cd.webp)
![[PRO Tips] Gold Market Under Short-Term Pressure, Safe-Haven Demand and Central Bank Buying Support Long-Term Upside Potential](https://xinker.org/uploads/images/202412/image_430x256_676ffb4685287.webp)
![[PRO Tips] Analysis of 9 key points of differentiation strategy! Master differentiation to create a brand advantage that is unique in the world!](https://firebasestorage.googleapis.com/v0/b/xinker-tips.appspot.com/o/article_thumbnails%2Fscaled_differentiation%20strategy.png.png?alt=media&token=a1bfc3d2-e85a-4db7-8a6d-01c7274f8940)
![[PRO Tips] Will REITs regain growth momentum in 2024? 3 REITs ETFs you must know if you want to invest in real estate.](https://firebasestorage.googleapis.com/v0/b/xinker-tips.appspot.com/o/article_thumbnails%2Fscaled_REITs1.png.png?alt=media&token=8af4eb93-33ff-466f-8039-b6555fad52b4)
![[PRO Tips] Complete tutorial on how to make money in Adobe Stock!](https://firebasestorage.googleapis.com/v0/b/xinker-tips.appspot.com/o/article_thumbnails%2Fscaled_tut-adobe1.png.png?alt=media&token=0b2c8cf2-22bd-4142-883e-140ed1cbaf02)
![[Passive Income] Unlock the secret of passive income: 3 steps to apply for Google AdSense](https://xinker.org/uploads/images/202410/image_430x256_6717a4fb3052b.webp)
![[Passive Income] Earn over $200 a day with AI-generated articles!](https://firebasestorage.googleapis.com/v0/b/xinker-tips.appspot.com/o/article_thumbnails%2Fscaled_article1.png.png?alt=media&token=f61bf35b-8553-4719-826d-7360024adc70)
![[Passive Income] Earn over 20 USD per download with AI-generated images!](https://firebasestorage.googleapis.com/v0/b/xinker-tips.appspot.com/o/article_thumbnails%2Fscaled_adobe2.png.png?alt=media&token=3e20e76a-a907-45af-80aa-bf9b3600301f)
![[Passive Income] Earn 10 USD per new download by sharing CapCut!](https://firebasestorage.googleapis.com/v0/b/xinker-tips.appspot.com/o/article_thumbnails%2Fscaled_capcut2.png.png?alt=media&token=a04dec40-1fac-4857-86f2-19a8be02d38e)
![[Passive Income] Use your WiFi to create passive income in 5 minutes, and you can earn 4-6 U per day!](https://firebasestorage.googleapis.com/v0/b/xinker-tips.appspot.com/o/article_thumbnails%2Fscaled_Grassio.webp.png?alt=media&token=7659a95e-0e47-4f27-a17d-c942ac3cf7f4)


![[Business Talk] The Unique Theme of XINKER's Song: Beef Wellington and Business Mastery](https://xinker.org/uploads/images/202410/image_430x256_671afc155f47f.webp)
![[Business Talk] Chagee: Opening 3,500 stores in 6 years](https://xinker.org/uploads/images/202410/image_430x256_671afce80c5f9.webp)
How to complete Gate to the Otherworld in Crimson Desert
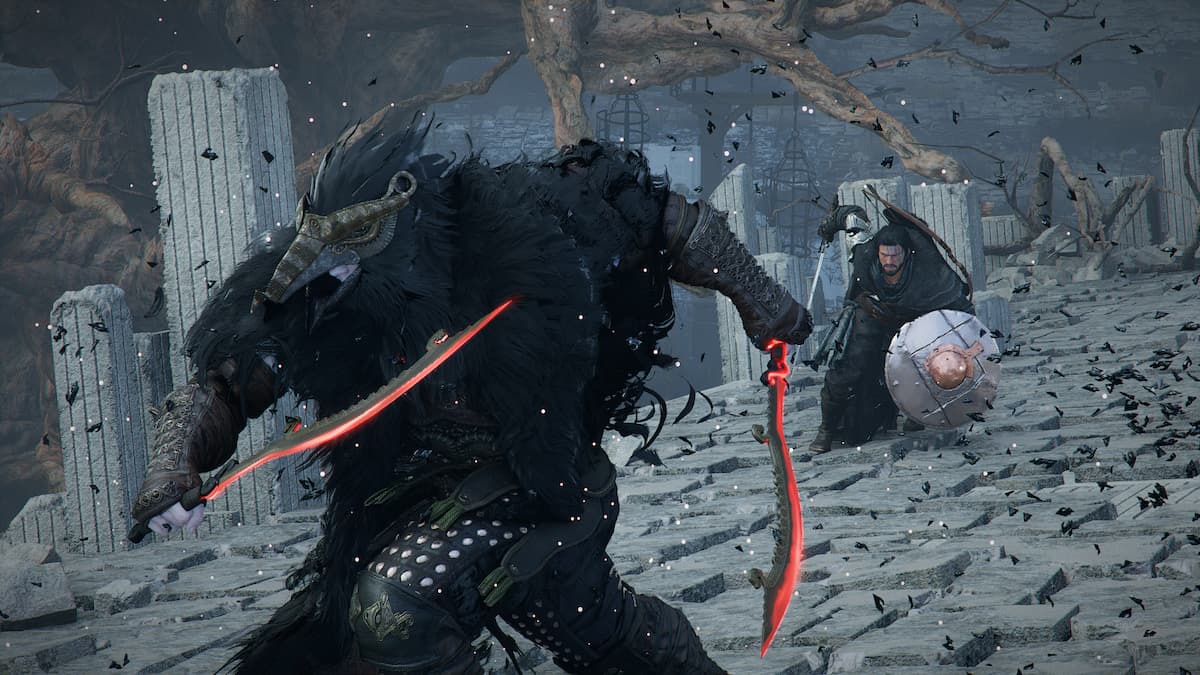
Chapter 4 in Crimson Desert introduces you to the Forbidden Knowledge questline, and Gate to the Otherworld is a subpart that can be a head scratcher. Things get confusing towards the end as there are two puzzles to solve and a boss to take down. Let's look at how to complete all the steps that are part of this sub-quest.Table of contentsCrimson Desert Gate of the Otherworld quest walkthroughHow to activate the lock device switchHow to solve the Device switch puzzleHow to use Axiom Force to remove the Unstable CoreHow to defeat Tenebrum in Crimson DesertCrimson Desert Gate of the Otherworld quest walkthrough The first task of the Gate of the Otherworld quest is to activate the lock device switch.How to activate the lock device switch Image via Pearl Abyss Once you reach the Scholastone Institute, you'll hear Octavius giving his speech before beginning the experiment. You can unlock the device (the dome) once the speech is over. Head right to where Octavius was earlier, and you'll find a set of stairs. You'll find an open space under the dome, and you'll then have to solve a stone puzzle.How to solve the Device switch puzzle The puzzle is a classic 3x3 grid. The objective is to light up all the pieces to activate the lock device. When you interact with any of the nine pieces, it will also activate all the corresponding vertical and horizontal stones. Image via Pearl Abyss First, press the symbiols symbols in the alternating corners. This will either be top-left and the bottom-right, or the bottom-left and top-right. Image via Pearl Abyss Now, interact with the remaining set of alternating corners and activate all four cornerstones. Now, only teh final one remains; interact with the middle stone, and this will power up the grind. This will also unlock the hand, which is used to activate the lock device. You can also quit to reset the grid and start solving it once again if you made a mistake.How to use Axiom Force to remove the Unstable Core Image via Pearl Abyss Go upstairs to power up the device. You'll find floating batteries when you return to the topside, and they have to be inserted in the adjacent pillars using Axiom Force. There are four pillars that have to be powered up. They will become active the moment a battery is inserted in them. Once all batteries are inserted, there will be a cutscene. Then, you'll need to remove the Unstable Core. Yank the core using Axiom Force to spawn the final Tenebrum boss.How to defeat Tenebrum in Crimson Desert Image via Pearl Abyss While the Tenebrum isn't the most difficult of enemies to kill, you'll need to use a special move. Use Blinding Flash to expose its weakness. This will increase the effectiveness of all your attacks. You'll also need to be mindful of the black projectiles since they can do a lot of damage. You can either hide behind the pillars or use the dodge. You can also use the aerial combat to get close to the Tenebrum. Then, you can use your Force Palm to damage the enemy. Ultimately, you'll need to combine all these moves and exploit its weakness to knock it out, which will complete the Gate of the Otherworld questline. The post How to complete Gate to the Otherworld in Crimson Desert appeared first on Destructoid.

Chapter 4 in Crimson Desert introduces you to the Forbidden Knowledge questline, and Gate to the Otherworld is a subpart that can be a head scratcher. Things get confusing towards the end as there are two puzzles to solve and a boss to take down.
Let's look at how to complete all the steps that are part of this sub-quest.
Table of contents
Crimson Desert Gate of the Otherworld quest walkthrough
The first task of the Gate of the Otherworld quest is to activate the lock device switch.How to activate the lock device switch
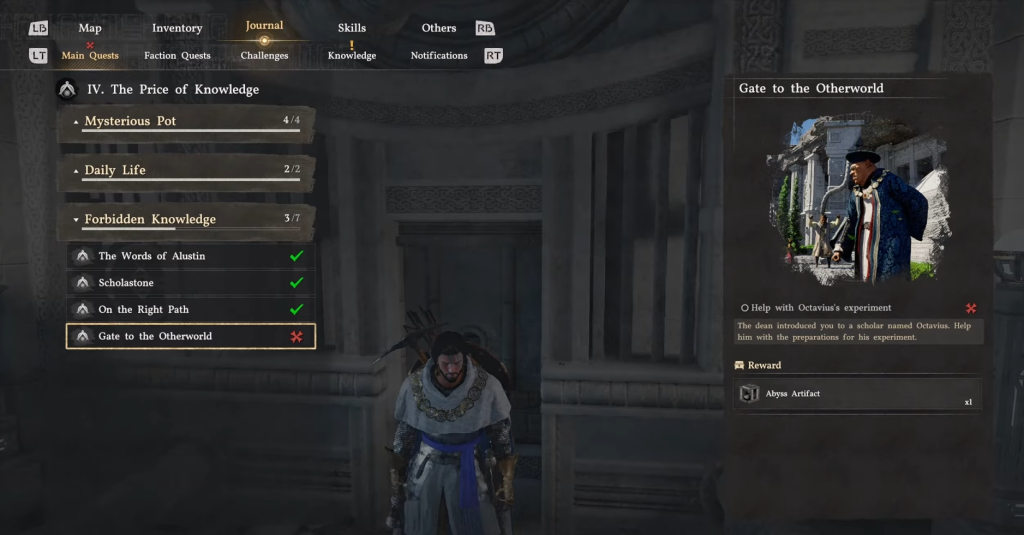 Image via Pearl Abyss Once you reach the Scholastone Institute, you'll hear Octavius giving his speech before beginning the experiment. You can unlock the device (the dome) once the speech is over. Head right to where Octavius was earlier, and you'll find a set of stairs. You'll find an open space under the dome, and you'll then have to solve a stone puzzle.
How to solve the Device switch puzzle
The puzzle is a classic 3x3 grid. The objective is to light up all the pieces to activate the lock device. When you interact with any of the nine pieces, it will also activate all the corresponding vertical and horizontal stones.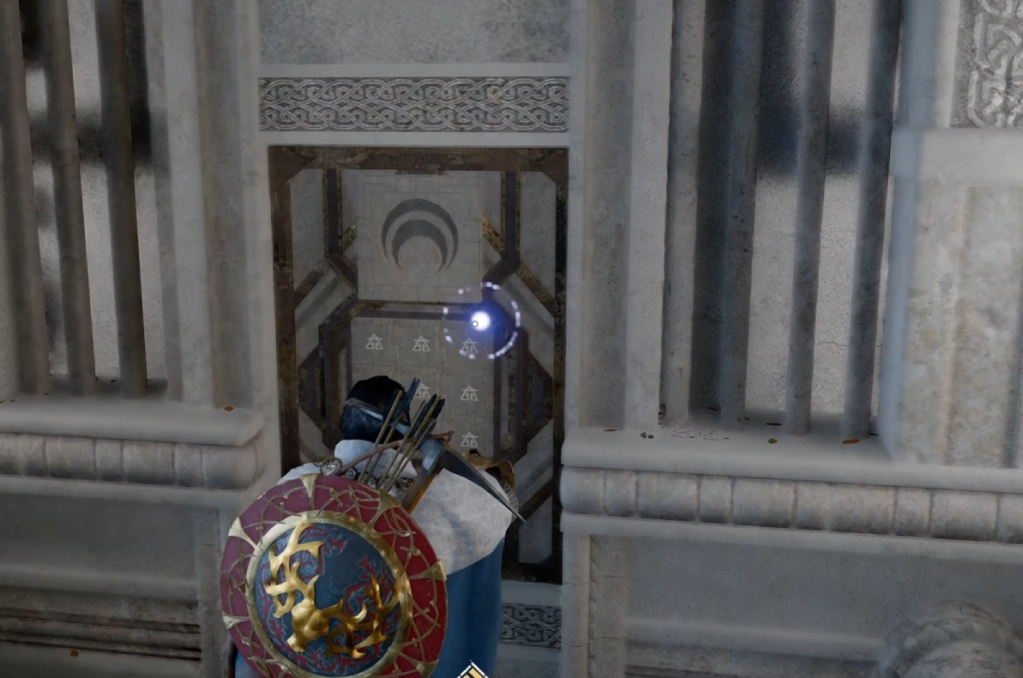 Image via Pearl Abyss First, press the symbiols symbols in the alternating corners. This will either be top-left and the bottom-right, or the bottom-left and top-right.
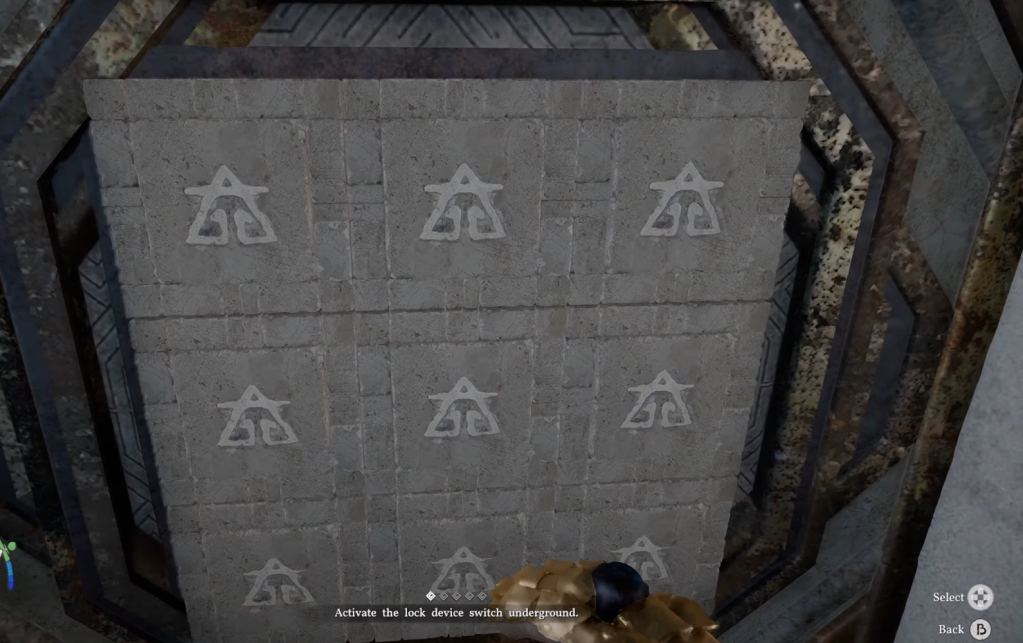 Image via Pearl Abyss Now, interact with the remaining set of alternating corners and activate all four cornerstones. Now, only teh final one remains; interact with the middle stone, and this will power up the grind. This will also unlock the hand, which is used to activate the lock device. You can also quit to reset the grid and start solving it once again if you made a mistake.
How to use Axiom Force to remove the Unstable Core
 Image via Pearl Abyss Go upstairs to power up the device. You'll find floating batteries when you return to the topside, and they have to be inserted in the adjacent pillars using Axiom Force. There are four pillars that have to be powered up. They will become active the moment a battery is inserted in them.
Once all batteries are inserted, there will be a cutscene. Then, you'll need to remove the Unstable Core. Yank the core using Axiom Force to spawn the final Tenebrum boss.
How to defeat Tenebrum in Crimson Desert
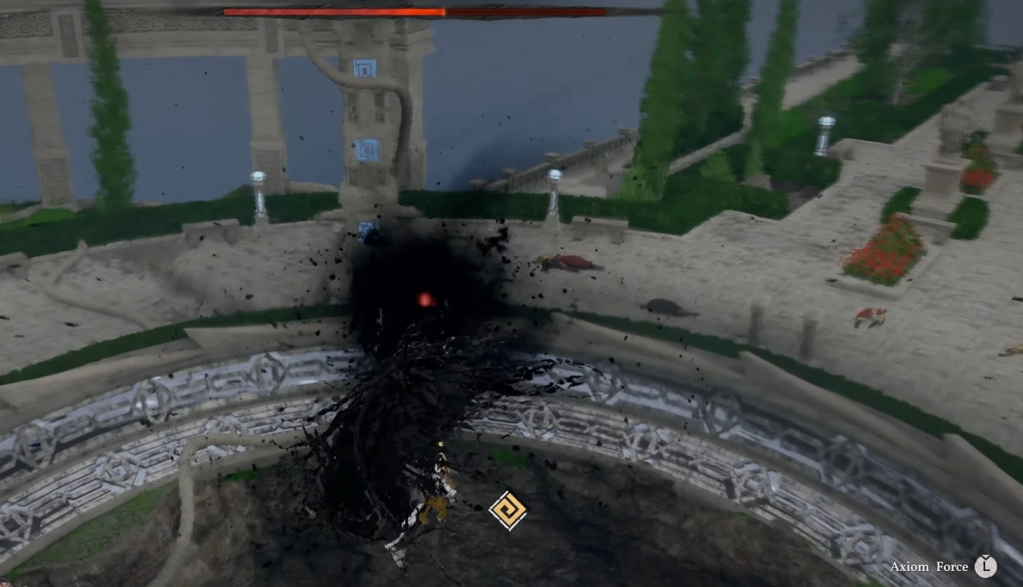 Image via Pearl Abyss While the Tenebrum isn't the most difficult of enemies to kill, you'll need to use a special move. Use Blinding Flash to expose its weakness. This will increase the effectiveness of all your attacks. You'll also need to be mindful of the black projectiles since they can do a lot of damage. You can either hide behind the pillars or use the dodge.
 You can also use the aerial combat to get close to the Tenebrum. Then, you can use your Force Palm to damage the enemy. Ultimately, you'll need to combine all these moves and exploit its weakness to knock it out, which will complete the Gate of the Otherworld questline.
The post How to complete Gate to the Otherworld in Crimson Desert appeared first on Destructoid.
What's Your Reaction?


XINKER - Business and Income Tips
Explore XINKER, the ultimate platform for mastering business strategies, discovering passive income opportunities, and learning success principles. Join a community of thinkers dedicated to achieving financial freedom and entrepreneurial excellence.