

Developer Diary | Australia: Until the Tide of Battle Swings
G’day mate!From the trenches of game development, we, Punchrullar and Mordred Viking, finally emerge. The time has come for the land from down under to undergo its long-awaited revision, and for the nine year old Australian content to get a fresh coat of war paint.For those who have not yet proven their bravery down south, we hope this will give you reason to; for those who have, we hope this will improve the experience even more. Without further ado, let’s dig into Australia. Australia 1936In 1936, Australia was like many other nations still licking its wounds from the Great Depression. The economic collapse did not only negatively impact employment and financial growth, but also population numbers. Poor fertility rates had been a concern for Australia's leaders ever since World War I, but now, with potential Japanese aggression looming, Australia’s small population became a particularly worrisome matter. Following Japan’s invasion into Manchuria in 1931, and later into China in 1937, fear of southward Japanese expansion grew. Along with the issue of its modest population, Australia had an underdeveloped military and was not at all ready for war. Even if Japan would stay within its own borders, another nation might yet force the Australians to arms; and not an aggressor, but an ally.With the Statute of Westminster still unratified, a potential British war would mean war for Australia too. After fighting for Britain in World War I and being led into the disastrous Gallipoli campaign, many Australians were hesitant about doing so once again. As civilians and veterans, ministers and military officials alike strained in different directions the war crept closer, and became, ultimately, a reality.It's Fight, Work or PerishHistoricalAustralia’s historical path is about the balance between placating British demands, and prioritizing domestic needs; just like Australian leaders walked the tightrope in the 1930s, players will do so now. By promoting either the continued rule of the governing party, or the rise of their successor, players will through elections unlock focus clusters that represent the policies of one of the two democratic parties. The United Australia Party, representing conservative liberals, values British overlordship and will in government unlock actions that strengthens British cooperation. The Australian Labor Party on the other hand, representing the social democrats, seeks self-sufficiency, and will in government unlock actions that grow Australian capabilities and lessen its dependencies. Dynamically, throughout the game, players will be able to switch between clusters and parties and shape Australia how they see fit, and although a certain party is not in government at a certain instance, their previous time in government will still impact possible player choices.As an effect of this, elections will hold importance despite them not leading to a switch of ideology. To represent the elections’ importance and current status, Australia’s focus tree will contain a ‘Democratic Elections’ window. Besides displaying the ‘Expected Winner’ of the next election, and when that election will be held, players may launch a ‘Party Campaign’ for either party, that over time will raise popularity by the cost of Political Power. Other player actions, such as certain focuses and events, will indirectly also impact democratic party popularity.The unlockable focus clusters will be represented by a golden wattle focus frame, accompanied by the UAP or ALP logo. Below the focus text is shown how many wins a party must have had for the cluster to be unlocked. Once a focus has been unlocked, it can not be locked even if the governing party switches again, so you are never time-gated to actually complete these political focuses.As final objectives, players have three options. Of course, there’s the option of going fully historical with John Curtin as standard-bearer, and face aggression first when the situation allows nothing else. But, if players don’t wish for their army to scramble into their uniforms, they will begin preparations before aggressors start moving too far south. By seeking autonomy and realizing the importance of national defense policies early, players have the chance to build up Australia’s own military industry and army, that late-game will be able to make its own outward advances. And as final option, players may go all out British patriot and utilize their overlord for every possible advantage, until the line between who is the subject and not blurs enough that it turns frivolous.Wartime LeadersThe different democratic parties definitely had their own policies, but so did the different prime ministers. Although John Curtin, without doubt, holds a top spot on the list of Australia’s most prominent leaders, other figures contributed to leading the nation through World War II too. We’re happy to present — from left to right — all new playable democratic leaders: Joseph Lyons, Robert Menzies, Billy
G’day mate!
From the trenches of game development, we, Punchrullar and Mordred Viking, finally emerge. The time has come for the land from down under to undergo its long-awaited revision, and for the nine year old Australian content to get a fresh coat of war paint.
For those who have not yet proven their bravery down south, we hope this will give you reason to; for those who have, we hope this will improve the experience even more. Without further ado, let’s dig into Australia.
In 1936, Australia was like many other nations still licking its wounds from the Great Depression. The economic collapse did not only negatively impact employment and financial growth, but also population numbers. Poor fertility rates had been a concern for Australia's leaders ever since World War I, but now, with potential Japanese aggression looming, Australia’s small population became a particularly worrisome matter.
Following Japan’s invasion into Manchuria in 1931, and later into China in 1937, fear of southward Japanese expansion grew. Along with the issue of its modest population, Australia had an underdeveloped military and was not at all ready for war. Even if Japan would stay within its own borders, another nation might yet force the Australians to arms; and not an aggressor, but an ally.
With the Statute of Westminster still unratified, a potential British war would mean war for Australia too. After fighting for Britain in World War I and being led into the disastrous Gallipoli campaign, many Australians were hesitant about doing so once again. As civilians and veterans, ministers and military officials alike strained in different directions the war crept closer, and became, ultimately, a reality.
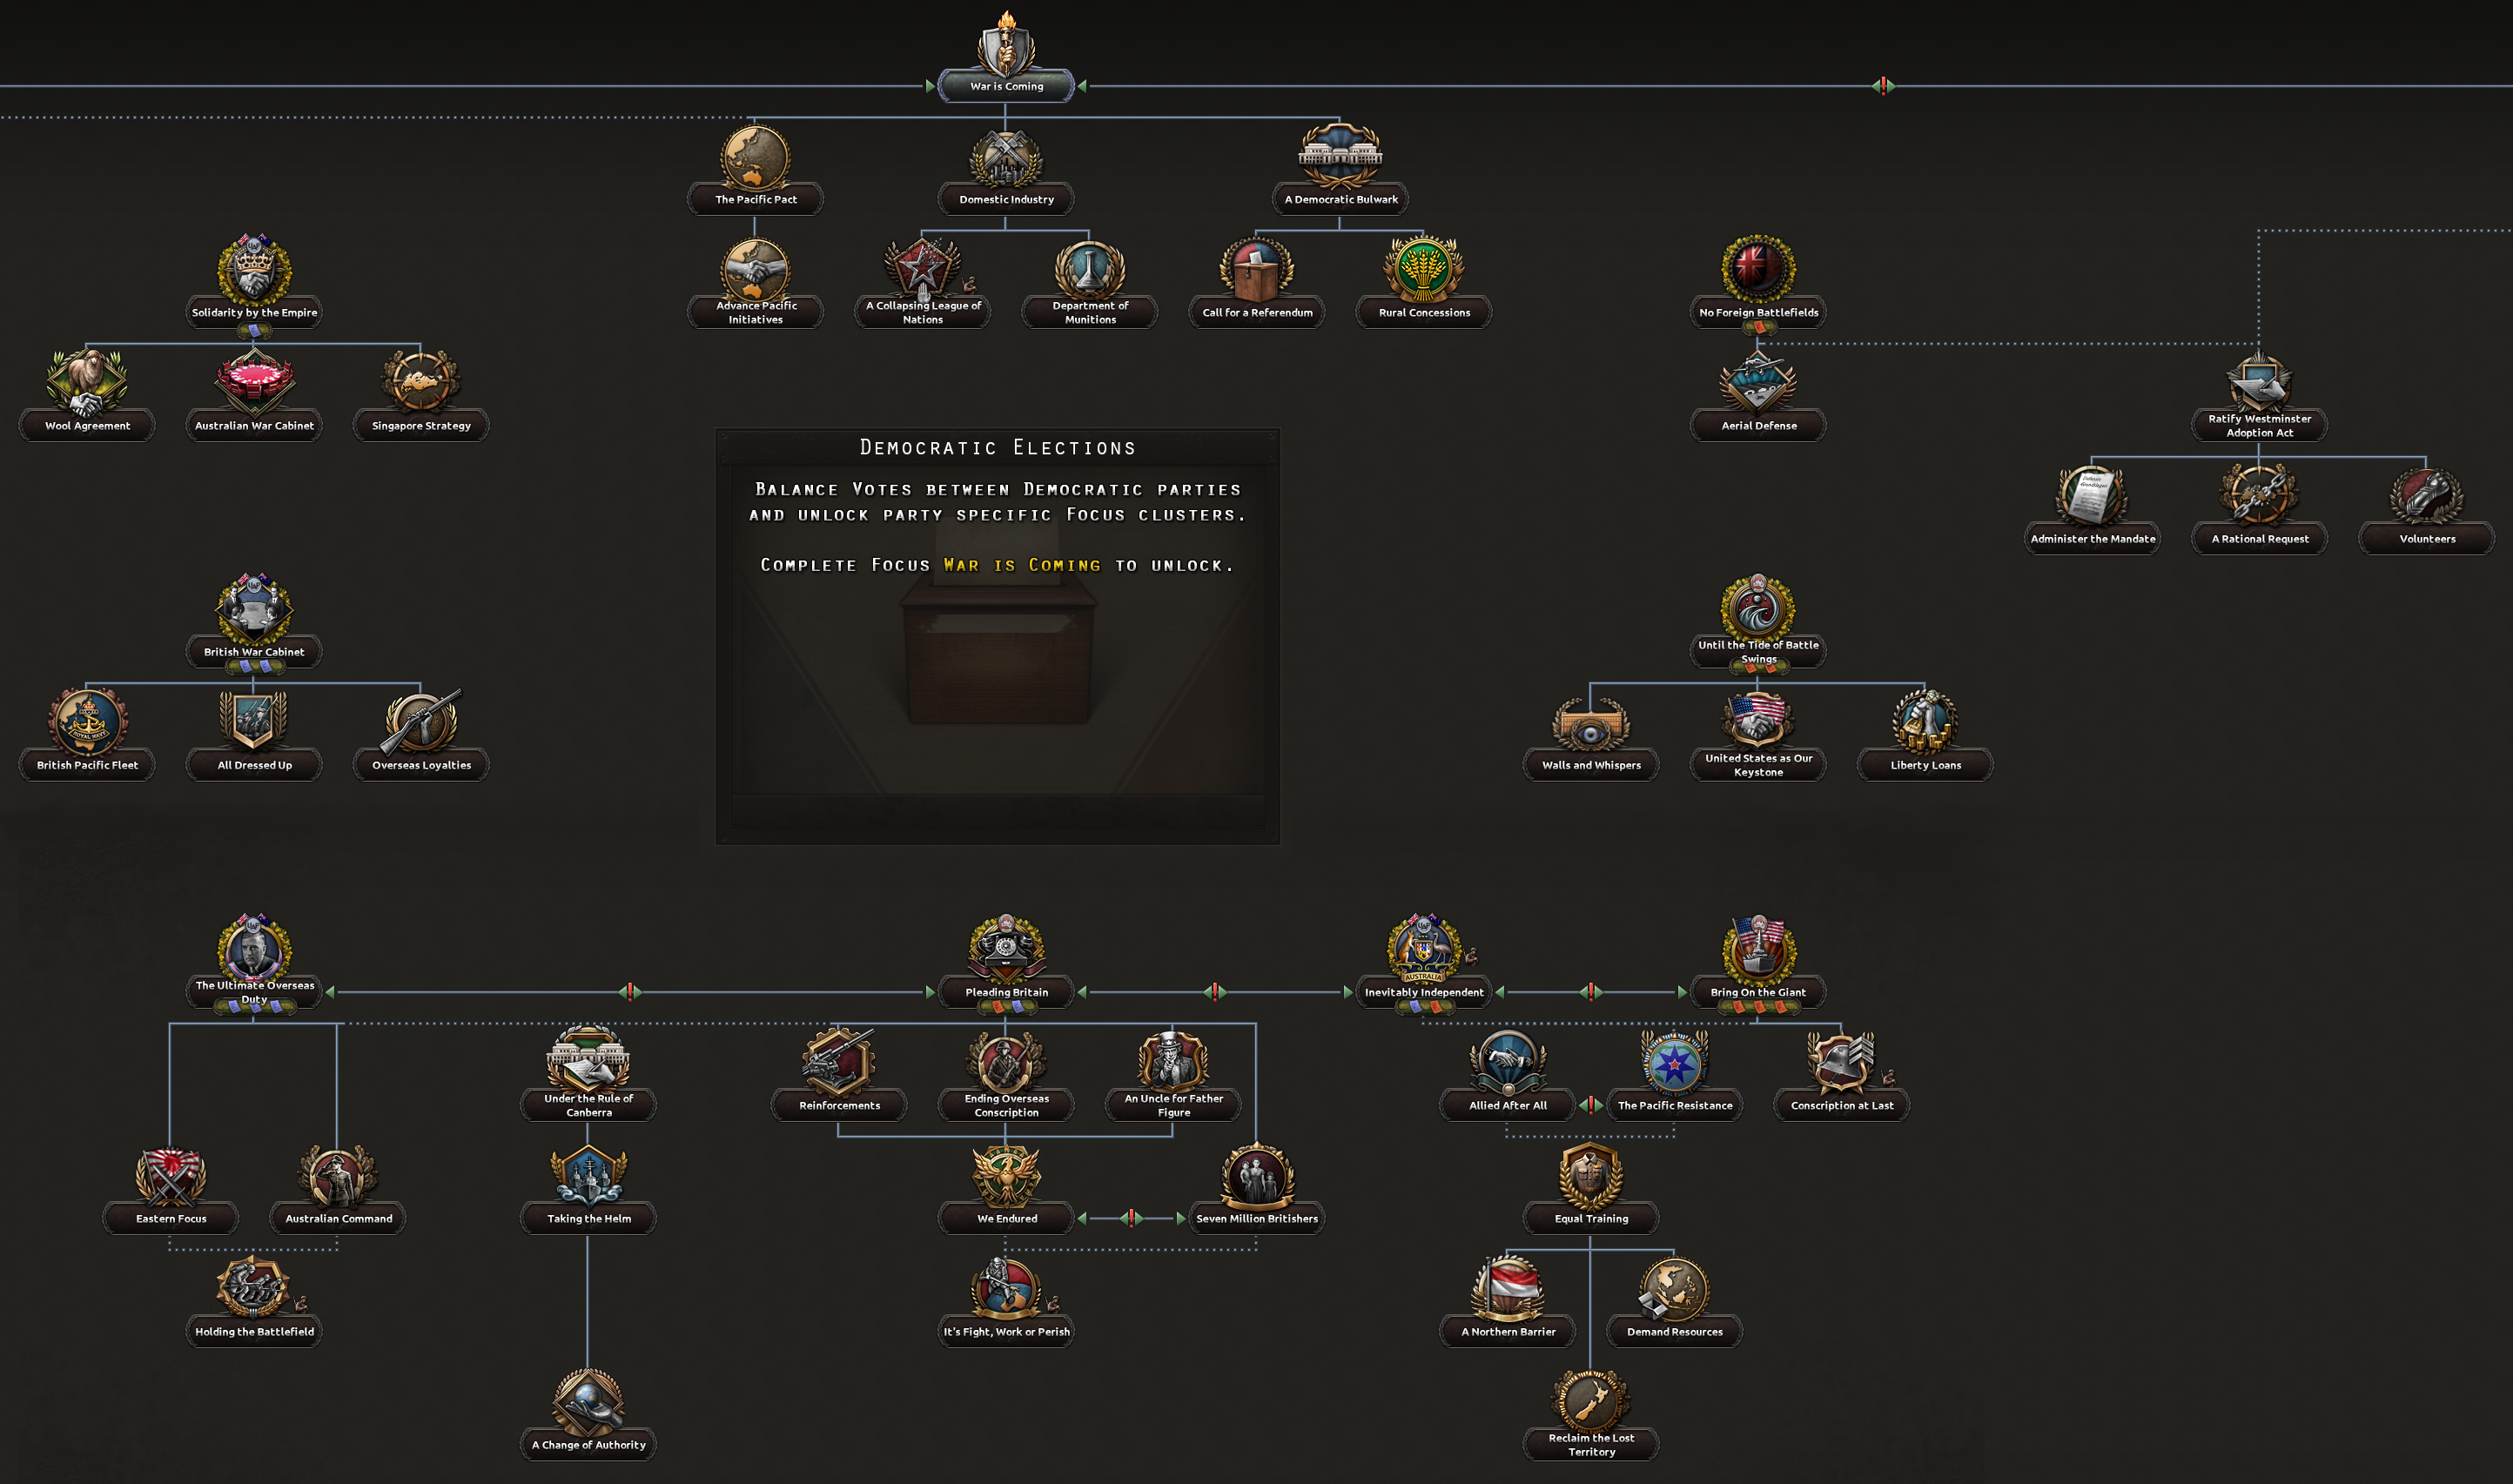
Australia’s historical path is about the balance between placating British demands, and prioritizing domestic needs; just like Australian leaders walked the tightrope in the 1930s, players will do so now. By promoting either the continued rule of the governing party, or the rise of their successor, players will through elections unlock focus clusters that represent the policies of one of the two democratic parties.
The United Australia Party, representing conservative liberals, values British overlordship and will in government unlock actions that strengthens British cooperation. The Australian Labor Party on the other hand, representing the social democrats, seeks self-sufficiency, and will in government unlock actions that grow Australian capabilities and lessen its dependencies. Dynamically, throughout the game, players will be able to switch between clusters and parties and shape Australia how they see fit, and although a certain party is not in government at a certain instance, their previous time in government will still impact possible player choices.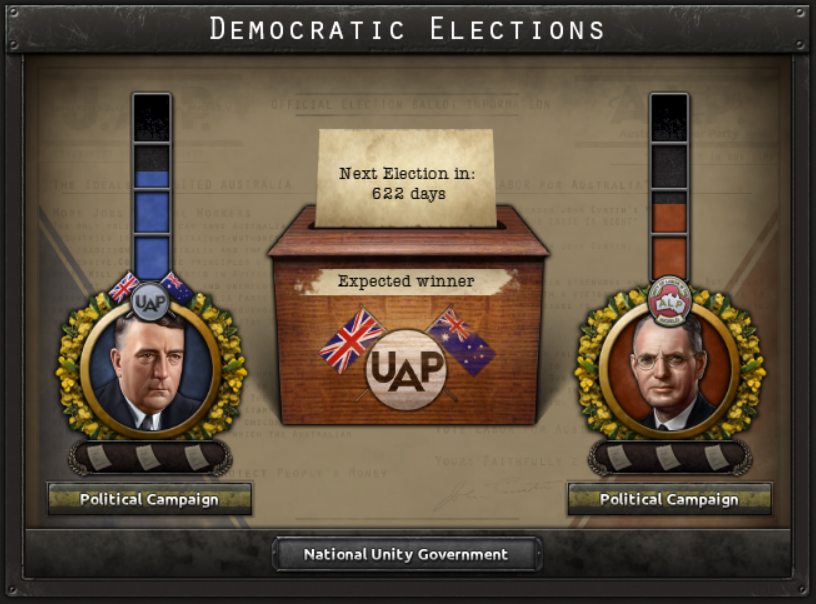
As an effect of this, elections will hold importance despite them not leading to a switch of ideology. To represent the elections’ importance and current status, Australia’s focus tree will contain a ‘Democratic Elections’ window. Besides displaying the ‘Expected Winner’ of the next election, and when that election will be held, players may launch a ‘Party Campaign’ for either party, that over time will raise popularity by the cost of Political Power. Other player actions, such as certain focuses and events, will indirectly also impact democratic party popularity.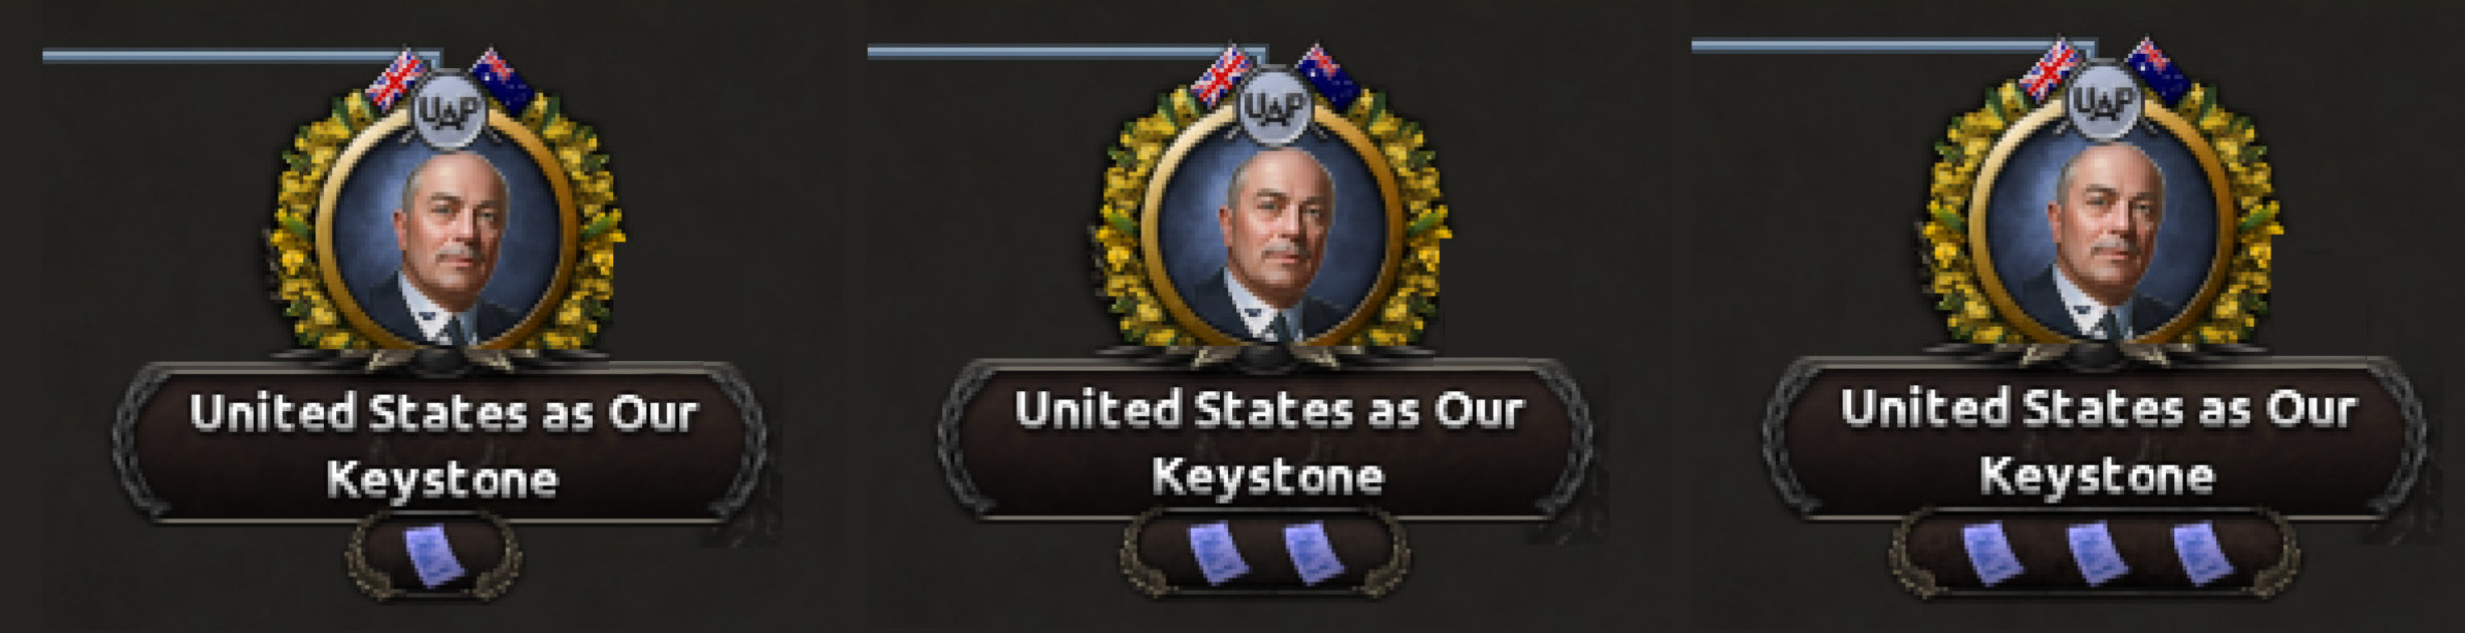
The unlockable focus clusters will be represented by a golden wattle focus frame, accompanied by the UAP or ALP logo. Below the focus text is shown how many wins a party must have had for the cluster to be unlocked. Once a focus has been unlocked, it can not be locked even if the governing party switches again, so you are never time-gated to actually complete these political focuses.
As final objectives, players have three options. Of course, there’s the option of going fully historical with John Curtin as standard-bearer, and face aggression first when the situation allows nothing else. But, if players don’t wish for their army to scramble into their uniforms, they will begin preparations before aggressors start moving too far south. By seeking autonomy and realizing the importance of national defense policies early, players have the chance to build up Australia’s own military industry and army, that late-game will be able to make its own outward advances. And as final option, players may go all out British patriot and utilize their overlord for every possible advantage, until the line between who is the subject and not blurs enough that it turns frivolous.
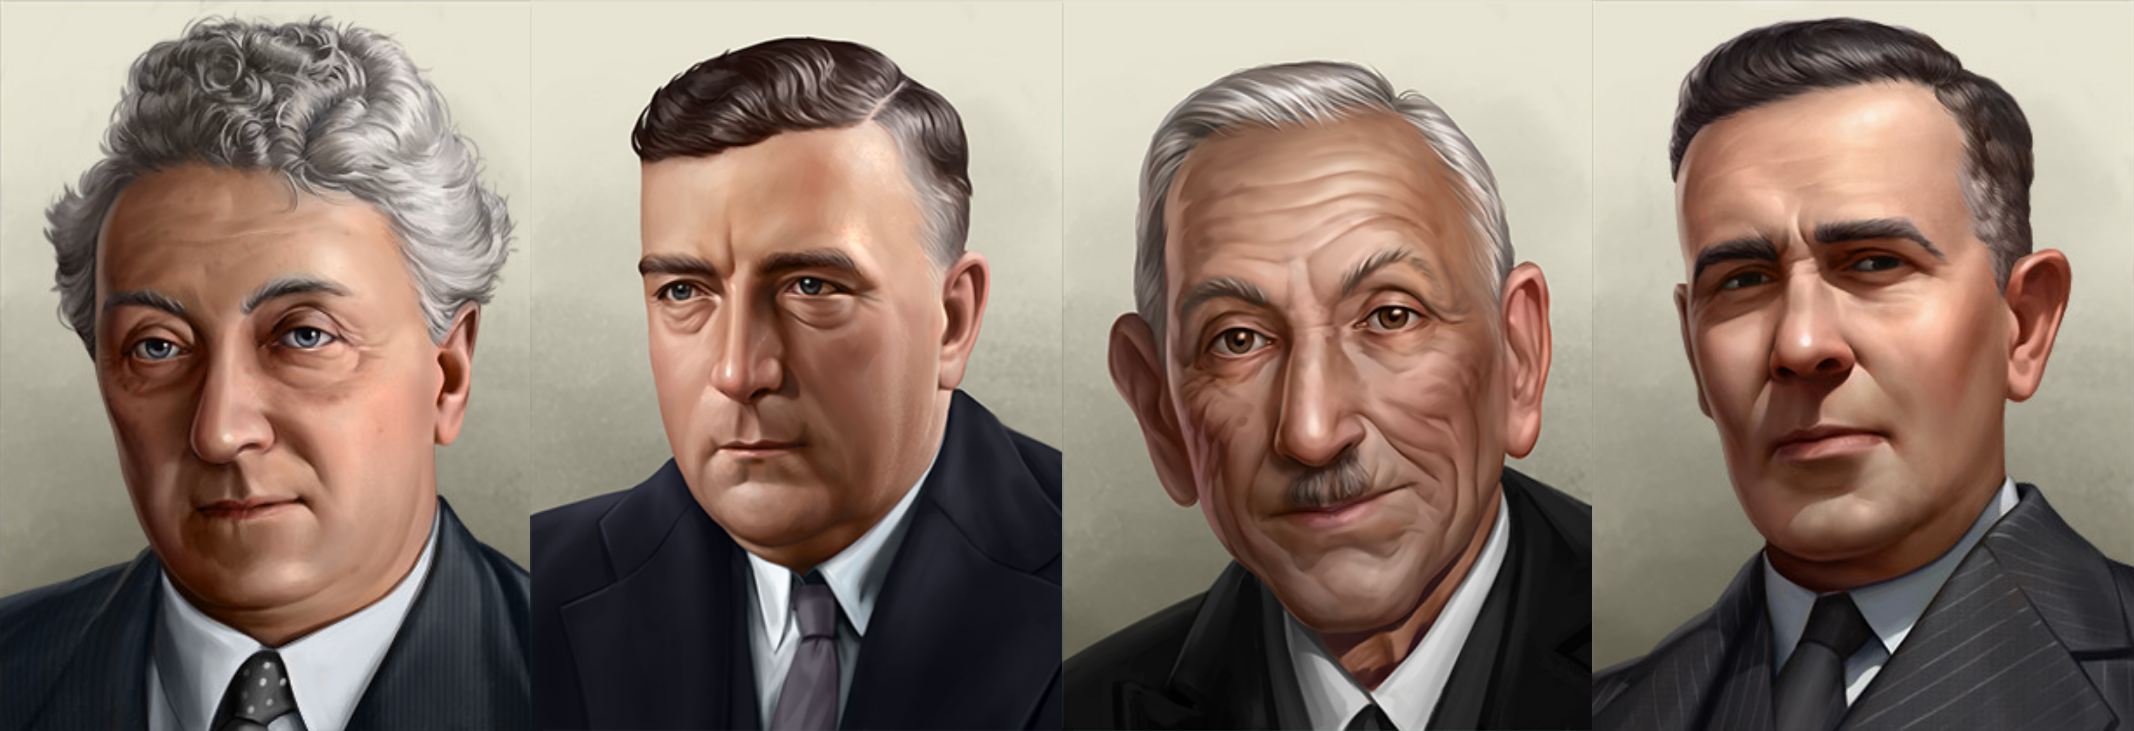
The different democratic parties definitely had their own policies, but so did the different prime ministers. Although John Curtin, without doubt, holds a top spot on the list of Australia’s most prominent leaders, other figures contributed to leading the nation through World War II too. We’re happy to present — from left to right — all new playable democratic leaders: Joseph Lyons, Robert Menzies, Billy Hughes & Ben Chifley.
And although we don’t intend to spoil the surprise of Australia’s new advisors just yet, we can’t help ourselves when it comes to these two. Please welcome the controversial Jack Lang, and the reliable coalition partner Arthur Fadden.
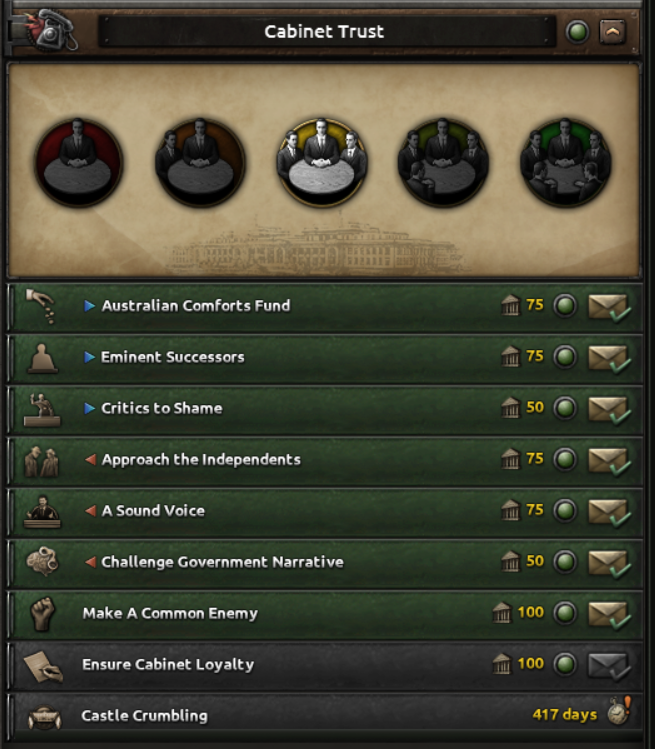
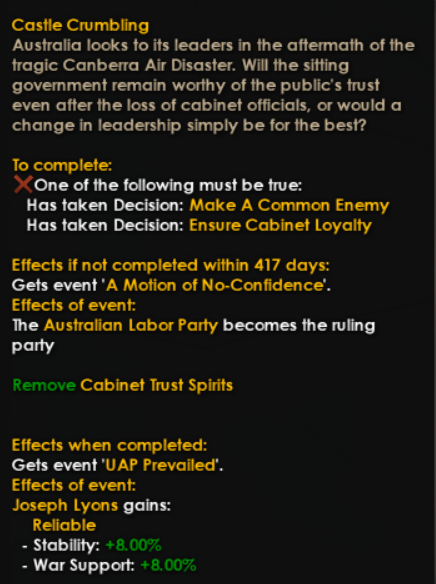
Leaving the strictly democratic content, there are a few historical matters that would impact whoever would have led Australia. And so, content-wise, they will. Starting off with one of the central systems for both democratic and non-democratic players: the ‘Cabinet Trust’ decision system. Following the Canberra Air Disaster, a tragic plane crash that killed highly respected military advisors, Australian politics got rocky. Support for the sitting government was already wavering due to failing trust in its war policies, and the loss of important war advisors did nothing to aid the situation. Historically, about a year after the Air Disaster, the sitting ministers were forced to resign by a non-confidence vote, and John Curtin’s government took their place.
Players will have to face the same trial, and may choose to either let their government resign, or to have it weather the storm. By doing one or the other, players will gain certain benefits and make certain sacrifices, but the most impactful effect the system will have for the democratic player is that it counts as an election; new clusters of UAP or ALP focuses will unlock when it’s either completed, or the mission has run out. Democratic players will have a time slot where they can trigger the system themselves, before it otherwise triggers at the event’s historical date. Although the system always will force maluses on the player, the decision to trigger is about knowing when the maluses are best weathered, or when the unlocking of new clusters is necessary.
In line with the feedback we received when touching upon the Canberra Air Disaster in a Dev Corner, we’ve decided to give players an opportunity to more cheaply replace advisors that they lose in the plane crash event. By the decision ‘Eminent Successors’, players gain a timed advisor discount.
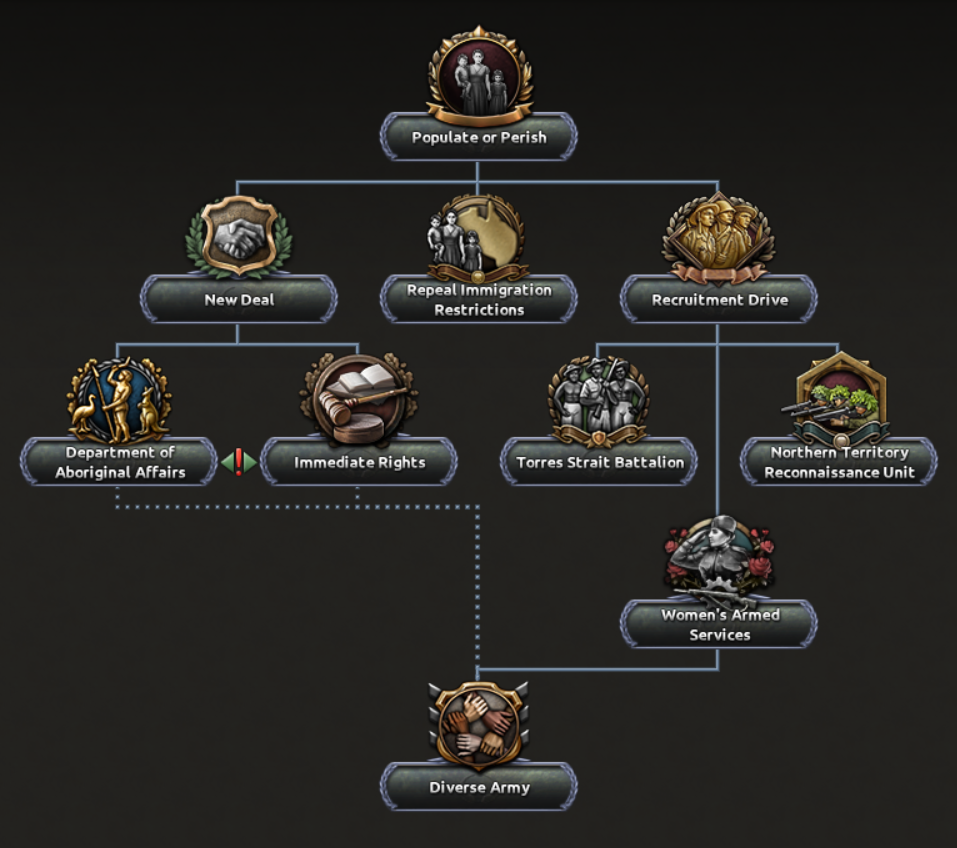
Besides the common Industry and Army branches that will be elaborated on below, there will be an additional common branch: Populate or Perish. As mentioned previously, low birthrates had in 1936 long been a national concern. Not only did a small population negatively impact industrial and economic growth, but it also made an army more difficult to raise. Players can tackle this obstacle by altering immigration policies, increasing nationwide welfare, and repealing restrictions in military recruitment, resulting in an increase in both civilian and army numbers.
We’re very happy to have the Northern Territory Recon Unit and the Torres Strait Battalion represented here. If it weren’t for your Dev Corner engagement, they wouldn’t be.
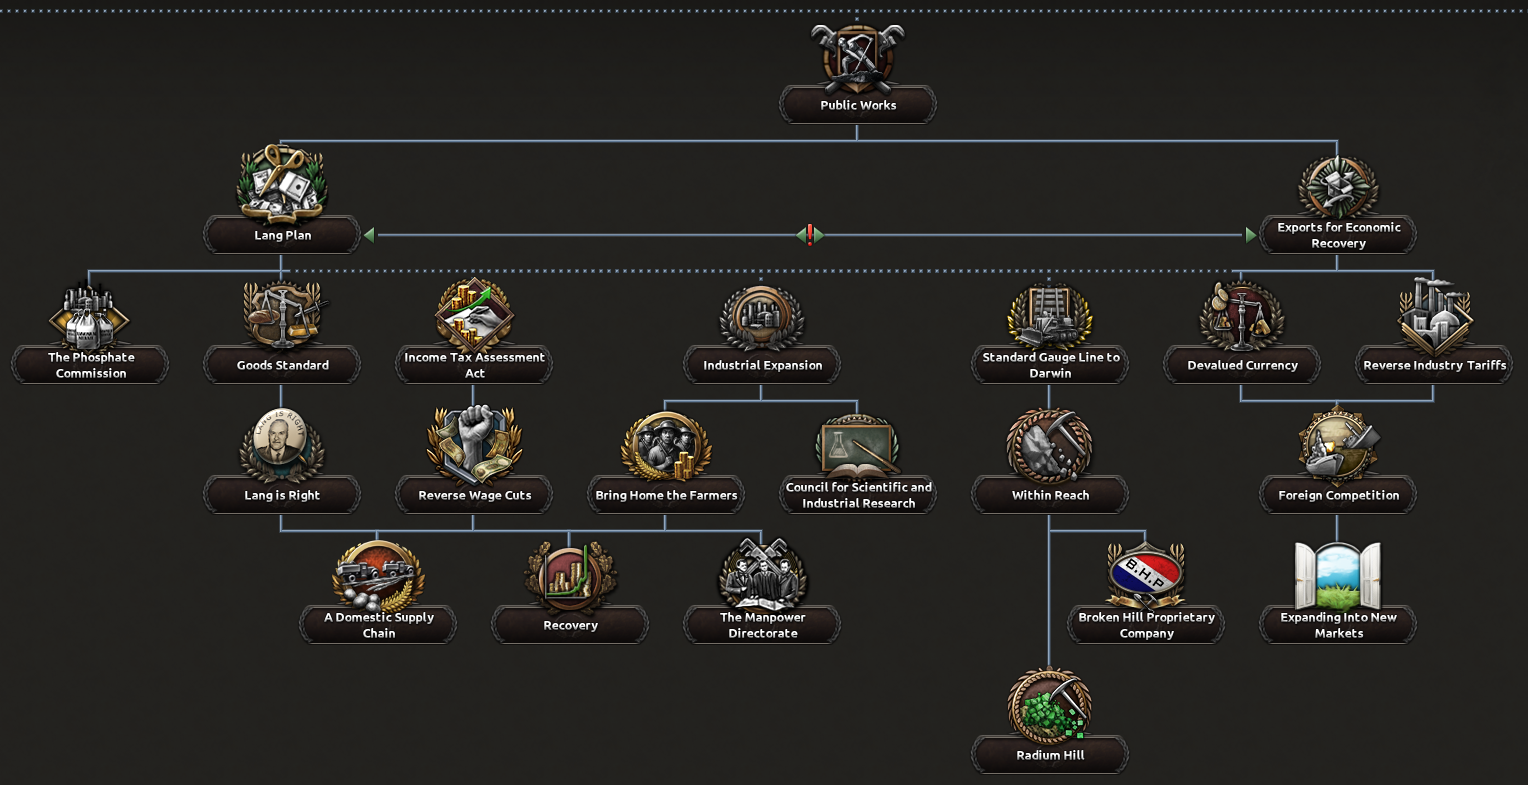
Moving on to the industrial side, we’ve done something a little different this time. Democratic and Fascist branches share one industrial branch, while the Communist side has their own. For today, we’re just going to be covering the former. To find out about the latter… well, you’ll just have to wait until Australia: Part 2!
All ideologies will need to contend with the Great Depression, with reductions to the imposed penalties scattered throughout the centre of the branch, and the effects being removed entirely with the “Recovery” focus.
The real question in this branch is which path to economic success do you take? Lang’s Plan, which focuses on domestic progress, or the Exports for Economic Recovery, which as you can likely infer by the name, relies on increasing economic exports abroad.
To break them down into their basics, Lang’s Plan will give you more factories up front, provides construction and consumer goods bonuses. Both paths give you access to additional resource development, but the Exports path really doubles down on this, even letting you open up the Pitbara mines, providing an effectively infinite supply of steel.
Speaking of resources, we’ve reworked Australia’s distribution of them. They now start with slightly fewer, but using the above decisions boost their resource output significantly in time. While they’ll never rival Indonesia in pure export capacity, it can certainly lean heavily on it, and of course are a more lucrative target for expansionist rivals.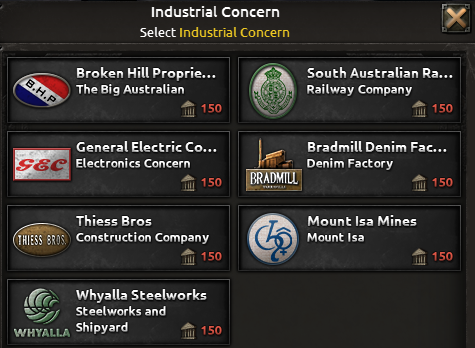
They also have a solid spread of industrial concerns available, with a handful which can be upgraded further. Here are a couple of highlights:
Broken Hill : The big dog of the pack, this provides resource extraction, and can be further upgraded to a whopping 20% resource extraction gain.
Mount Isa Mines : Provides a reduction in lack of resources penalties, in case you want to tap into the historical Australian aircraft production and run short on rubber and aluminium.
Whyalla Steelworks : Provides a base line of steel, as well as dockyard output.
Bradmill Denim Factory : Increases production of infantry equipment.
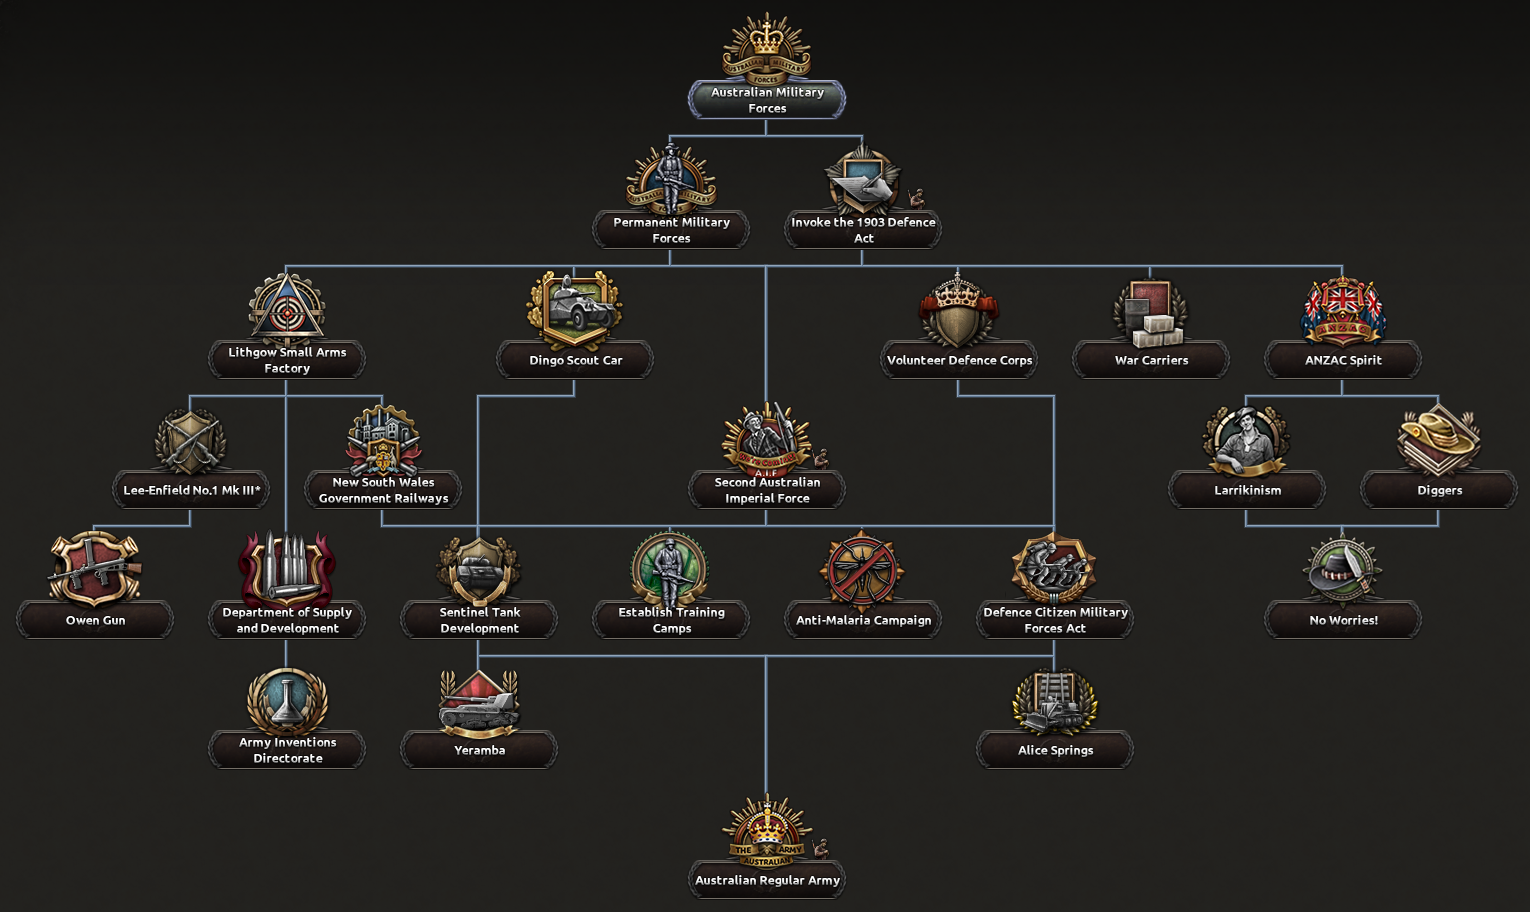
Since becoming a dominion with its own military, the Australian Army was centred around a militia force responsible primarily for home defence. When Britain called upon Australia to serve abroad, a separate expeditionary force would be raised for overseas service. In the case of the Great War, for example, Australia raised the First Australian Imperial Force (AIF), which served in North Africa, the Middle East, and of course Gallipoli. Outside of this, by law the remaining militia forces could not be deployed overseas.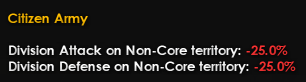
Australia therefore begins with significant obstacles to overseas action. However, as you may know, during the Second World War Australia became particularly well known for its combat tenacity across the globe. So how do we represent this shift? Expeditionary Forces.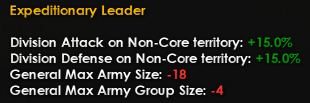
We’ve introduced a new general trait: the Expeditionary Leader. This trait provides a dramatic bonus to both attack and defence when fighting in non-core territory. It also comes with hefty penalties to command capacity, with a general only able to effectively handle 6 divisions instead of the usual 24, and field marshals limited to just 1 army instead of 5. In this way, countries like Australia can provide highly potent forces abroad, but only in limited numbers.
As a side note, this trait is only granted through focuses, it cannot be assigned freely. Similarly, generals who receive it begin with it, so there is no risk of a high-level general suddenly being reduced to commanding only 6 divisions.
Australia can also, over time, reduce its overseas penalties and become increasingly adept at fighting on distant battlefields.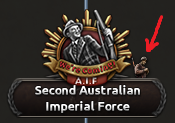
Manpower is another major concern for Australia, and something that will always be in short supply. Alongside a relatively small population, Australia cannot simply increase conscription at will. Instead, it must build the political will to enable it. Focuses such as the Second Australian Imperial Force include a small symbol indicating that they unlock an increase in conscription law by one step. It does not matter in which order these are taken, they will always increase the cap by one step, though you must still pay the 150 political power cost.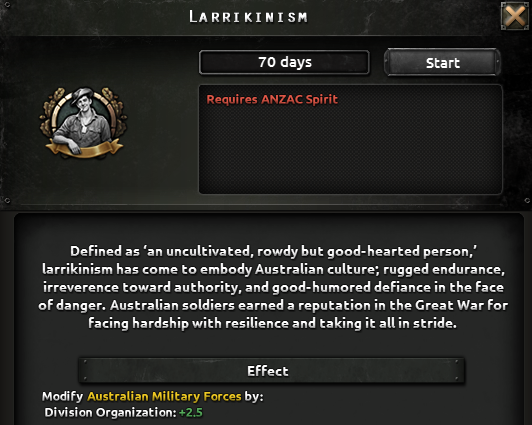
The final part of the Australian army tree we want to highlight is the ANZAC spirit branch. The Great War, and Gallipoli in particular, became a defining aspect of the Australian national identity. The experiences of this conflict shaped not only the world’s perception of Australia, but also how Australians saw themselves. We wanted to highlight the distinctive attitude to war often associated with Australian forces, sometimes referred to as larrikinism. This is best described by the focus itself, and is one of the very few instances of a focus granting a flat bonus to organisation rather than a percentage. When Australians commit to a fight, they stick to it!
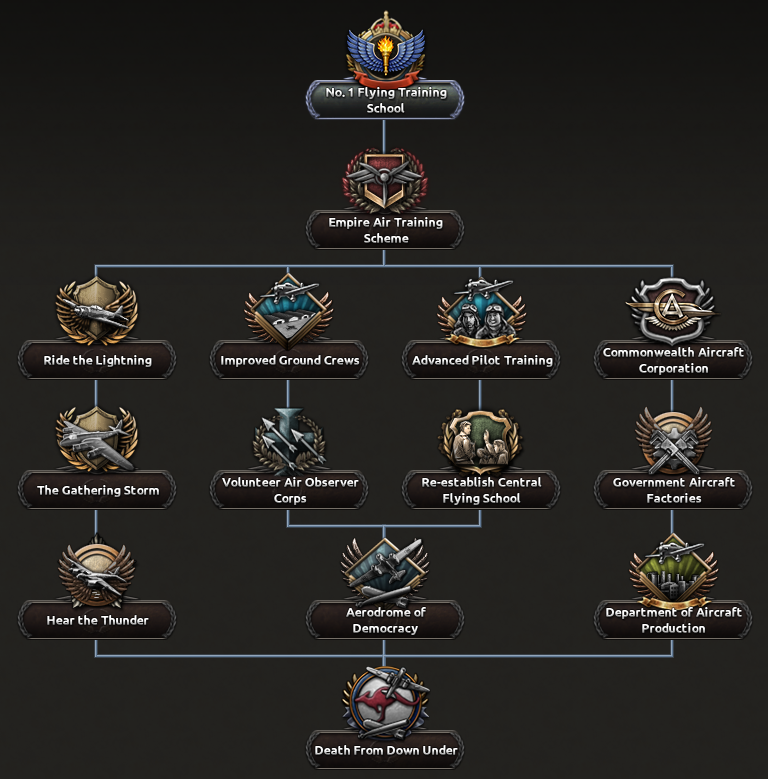
One thing which surprised us during our research into Australia is that by the end of the Second World War, the Royal Australian Air Force had become the 4th largest Air Force in the world. We wanted to reflect this in the design of the air branch, so Australia gains a fair number of free military factories and production bonuses down the right-hand side.
When Britain was discussing the possibility of establishing the Commonwealth Air Training Plan, there was serious consideration given to basing it in Australia (it was ultimately established in Canada). In Australia, participation in this initiative became known as the Empire Air Training Scheme, and the centre of this branch explores a “what if” scenario in which Australia had been chosen as the primary host.
As you can see, Australia receives a strong mix of production, effectiveness, and technology bonuses for its air force, allowing it to become a serious contender in the skies.
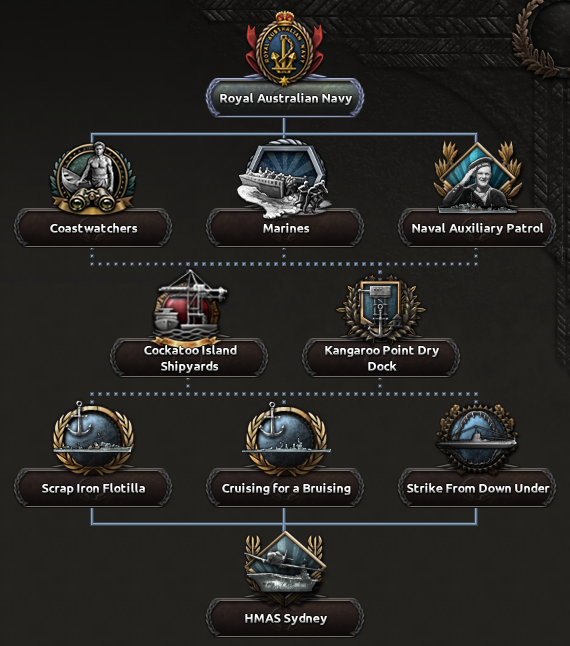
Australia is an island nation, so its naval power is naturally of great importance. During the Great War, the Royal Australian Navy was a significant regional asset. However, in the interwar years it was dramatically reduced in size, and the early part of the focus tree is dedicated to rebuilding it.
There are also several unique elements included. For example, the Coastwatchers were a group of Australian personnel and local islanders who operated across the islands to the north, observing and reporting on enemy movements, particularly naval and air activity, effectively acting as an early warning system. Notably, Coastwatchers assisted in the rescue of future U.S. President John F. Kennedy.
The “Scrap Iron Flotilla” is another notable historical element. This was a group of ageing destroyers deployed in the Mediterranean, derisively labelled by Nazi propaganda, but they proved highly effective despite their age.
Finally, the capstone is HMAS Melbourne. Historically, together with HMAS Sydney, these ships made Australia the only Commonwealth nation besides Britain to operate fleet carriers.
Cheers for joining us on this one, guys! We’ll be back soon with another cracking Dev Diary. Next up, the alt-history paths for Fascism and Communism. Until then, take it easy, ya little rippers!
你覺得這篇文章如何?